Forensic recovery of deleted Android files is often possible, but it depends entirely on encryption status, device state and how quickly the device is preserved. Do not attempt any DIY recovery app or factory-reset workaround. The correct first action is to isolate the device from network access, stop all interaction with it, and contact a qualified digital forensics lab such as Computerforensicslab with your legal authorisation and full device details before anything else happens.
TL;DR:
- Recovering deleted Android data depends heavily on device encryption status, the timing of preservation, and avoiding actions that overwrite data.
- Immediate steps include isolating the device from networks, avoiding power on or factory resets, and documenting its physical and handling condition to preserve evidence.
- Acquisition methods vary from logical to physical, with the most comprehensive recovery possible through bit-for-bit imaging, but hardware encryption and device state limit recoverability.
- Deleted data can disappear within minutes due to garbage collection and TRIM commands, making rapid response critical to successful recovery.
- For legal admissibility, all recovered evidence requires strict chain-of-custody documentation, hashing, and detailed reporting to ensure credibility in court.
Table of Contents
- Preservation checklist: what to do (and avoid) at first contact
- What happens when a lab receives the device?
- Which acquisition method fits a given case?
- Why does recovery success shrink so fast after deletion?
- How is recovered data validated for court?
- What should you provide when instructing a lab?
- How long does forensic Android recovery take, and what drives cost?
- Can you restore deleted files yourself using Android’s built-in tools?
- What recovery software exists for typical users, and where does it fall short?
- How do you avoid overwriting data before recovery is attempted?
- What are the risks of attempting DIY recovery yourself?
- How can you back up Android data to prevent this happening again?
- What do practitioners get wrong most often about Android recovery?
- How Computerforensicslab supports legally admissible Android recovery
- Sources
Preservation checklist: what to do (and avoid) at first contact
What happens in the first minutes after a deletion is discovered often decides whether evidence survives. Android’s own housekeeping processes work against you, so the priority is to freeze the device exactly as found and hand it to a specialist rather than experiment.
- If the device is on and unlocked, switch to airplane mode or place it in a Faraday bag immediately to stop remote wipe commands or automatic sync overwriting data.
- If it is off, leave it off. Powering on an unfamiliar device can trigger background processes that overwrite exactly the blocks you need.
- Seize chargers, SIM cards and any external storage found with the device.
- Photograph the device’s physical state and any visible screen settings before bagging it.
- Log who handled the device, exact timestamps, and the legal basis for seizure (warrant, consent, company policy).
- Never run recovery apps, factory reset, or attempt to power cycle the handset.
- Contact the lab with a case reference, the device make and model, and whether a passcode is known.
Pro Tip: Keep the device in the Faraday bag even during transport to the lab — a phone that briefly reconnects to a network can silently sync and overwrite deleted content before an examiner ever opens a case file.
What happens when a lab receives the device?
Once the device arrives, SWGDE’s best practices call for meticulous documentation of physical condition and chain-of-custody continuity before any technical work begins. That discipline is what separates admissible evidence from a compromised exhibit.
The workflow generally follows four stages:
- Intake and documentation. Physical markings, packaging condition and custody transfer are logged the moment the device crosses the threshold.
- Non-destructive inspection. Examiners assess Android version, encryption state and physical damage without touching stored data.
- Triage and method selection. The least invasive acquisition capable of meeting the case’s evidential needs is chosen, rather than defaulting to the most aggressive option.
- Imaging, parsing and manual review. Automated tools extract artefacts, build timelines, and flag data where automated parsing fails and a human examiner has to step in.
Turnaround varies by case complexity, but the deliverable is consistent: a forensic image, parsed exhibits, acquisition logs, cryptographic hashes and a signed expert report. That report is the document a court actually reads, and it is only as credible as the process behind it.
Which acquisition method fits a given case?
Not every case calls for the same level of intrusion, and the acquisition method chosen shapes both what can be recovered and how defensible the result is in court.
- Logical acquisition reads visible files through the operating system’s own interfaces. It is the least invasive option and often sufficient for straightforward disclosure requests, but it generally cannot recover deleted artefacts because it only sees what the file system currently exposes.
- File-system acquisition captures the underlying structure, including some unallocated space and journal areas where deleted records can persist. This is where recoverable evidence often surfaces, though modern encryption can still block access.
- Physical acquisition produces a bit-for-bit image of the storage chip, the most complete option for uncovering deleted data. Locked bootloaders and hardware-backed encryption, however, can render even a successful physical image cryptographically unreadable without the device’s own keys.
- ISP, JTAG and chip-off extraction involve connecting directly to test points or physically desoldering memory chips. These raw extraction methods work on damaged or heavily locked devices but carry real risk of permanent hardware damage and demand specialist reconstruction of the raw data afterwards.
Choosing between these approaches is not a technical preference exercise. It is driven by what the case actually needs, what state the device is in, and what legal authority permits. Computerforensicslab’s Android forensics guide sets out how these trade-offs are weighed in practice.
Why does recovery success shrink so fast after deletion?
Deleted data does not sit quietly waiting to be found. Android’s storage management is actively working to reclaim space the moment a file is marked for deletion, and that process is where most recovery attempts fail before they even begin.
The urgency is measurable. Experimental testing on deleted-data persistence found that obsolete data blocks were erased by system garbage collection in as little as seven minutes and fifty three seconds after deletion under certain conditions.
TRIM commands and garbage collection routines exist to keep flash storage performing well, and they treat “deleted” blocks as free space to be wiped and reused. Wear-leveling algorithms distribute this activity unpredictably across the chip, which is why recovery outcomes can look almost random from one device to the next.
Filesystem choice matters too. Older Android builds running YAFFS2, and newer ones on ext4 or F2FS, each leave deleted artefacts in different places, often within journal areas or unallocated space that a file-system or physical acquisition can reach. Research on deleted-data recovery found recoverable material persisting in these journal areas on Android 9 and 10 devices in certain deletion scenarios.
File-based encryption and hardware keystores add a final obstacle: even a perfectly captured image can remain cryptographically sealed without the correct keys.
Pro Tip: If a device has been left powered on and in normal use for hours after a suspected deletion, tell the lab immediately. Knowing the elapsed time changes how the examiner sets expectations for the client, not just how they approach the acquisition.
How is recovered data validated for court?
An unhashed recovery is worth very little to a court. Every acquired image and extracted artefact needs a verifiable audit trail from the moment it leaves the device to the moment it appears in a report.
- Every acquired image and artefact is hashed, and those hash values are preserved permanently in the chain-of-custody record.
- Software used, exact tool versions, examiner actions and any incidental changes made during analysis are documented in full.
- Deliverables include reproducible acquisition logs, raw or E01 images, parsed evidence exports and a signed expert report explaining both methodology and limitations.
- Reputable reporting states uncertainty plainly rather than overstating confidence, so a court can weigh reliability rather than take a conclusion on trust.
NIST’s mobile device forensics guidance treats this documentation as inseparable from the technical recovery itself; a result without a defensible audit trail is not forensic evidence, just data. Computerforensicslab’s approach to recovering deleted data for legal cases follows the same standard.
What should you provide when instructing a lab?
A lab cannot begin work on authority alone. It needs the paperwork and context to define the scope of the job and prevent wasted time on an acquisition method the case does not actually need.
- Provide written legal authority, whether a warrant or signed consent, along with a case instruction that specifies exactly what the lab is authorised to examine.
- Supply device identifiers, any known passcodes, ownership status, relevant linked accounts and details of any preservation orders already in place.
- Ask the lab to set out its planned acquisition method, likely limitations given the device and OS version, and expected outputs and timescales.
- Request a scoped fee estimate up front, and ask whether expedited or priority handling is available for time-critical disclosure deadlines.
Computerforensicslab’s guide to recovering deleted data for legal investigations sets out the instruction process in more detail for solicitors and corporate legal teams working to court deadlines.
How long does forensic Android recovery take, and what drives cost?
Timescales and cost both track directly with how invasive the acquisition needs to be.
- Routine triage and logical review typically turns around fastest, standard file-system acquisition and analysis takes longer, and full hardware-level recovery via chip-off or ISP takes longest of all.
- Damaged devices, the need for chip-off or ISP extraction, complex decryption work and manual parsing of obscure or custom apps all push cost upward.
- Emergency prioritisation and rapid-response handling exist for time-critical cases but carry a premium over standard scheduling.
Can you restore deleted files yourself using Android’s built-in tools?
For matters that do not require evidential admissibility, Android does offer some limited native recovery routes worth understanding, even though they fall well short of forensic standards.
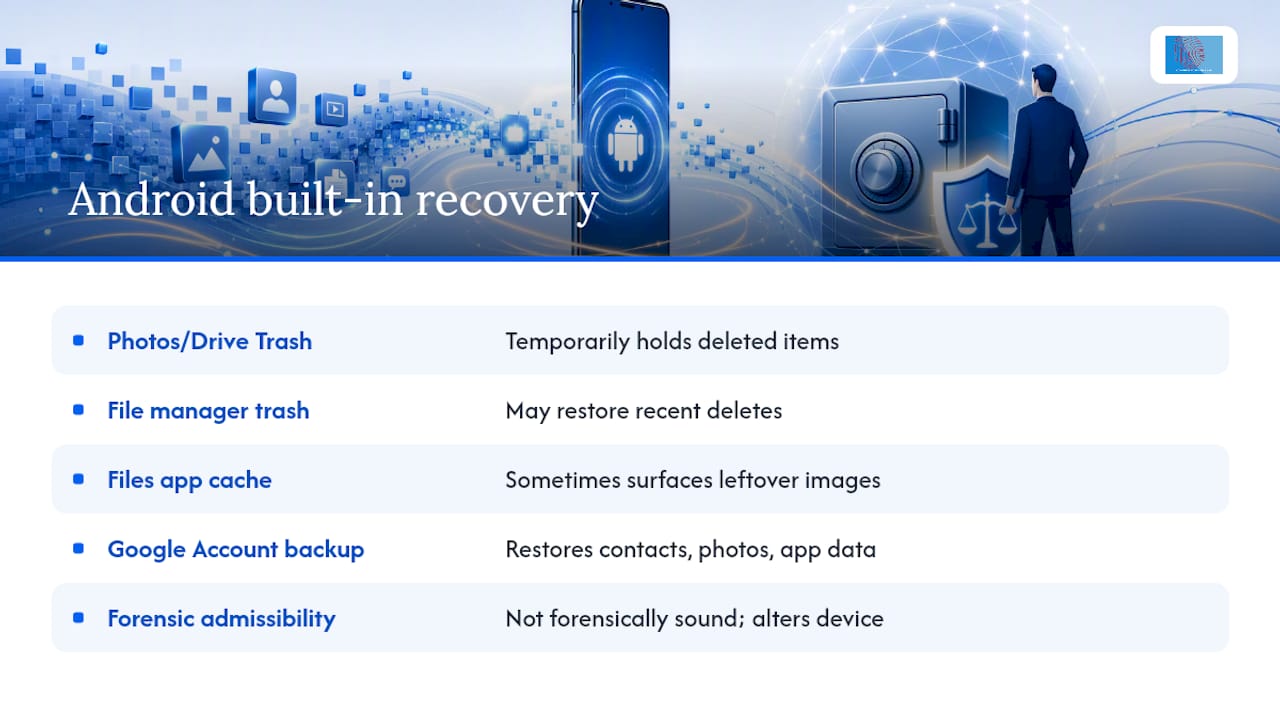
Google Photos and Google Drive both keep a Trash folder that holds deleted items for a set period before permanent removal, and checking there first resolves many accidental deletions. Some file manager apps include a similar Recently Deleted section. Android’s Files by Google app can occasionally surface leftover cached copies of images, though it was not built as a recovery tool. If the device is backed up to a Google Account, restoring from a recent backup during device setup can bring back contacts, photos and app data lost through a reset.
None of these routes touch data that has already been purged from these holding areas, and none of them produce anything resembling a forensically sound result. They rely entirely on the operating system’s own housekeeping still holding a copy somewhere accessible, which is precisely the window that TRIM and garbage collection close quickly. For a private individual trying to recover a personal holiday photo, this is a reasonable first stop. For anything that might end up in front of a judge, opening these apps and clicking around is itself a risk, because every interaction with the device changes it and can undermine a later forensic acquisition.

What recovery software exists for typical users, and where does it fall short?
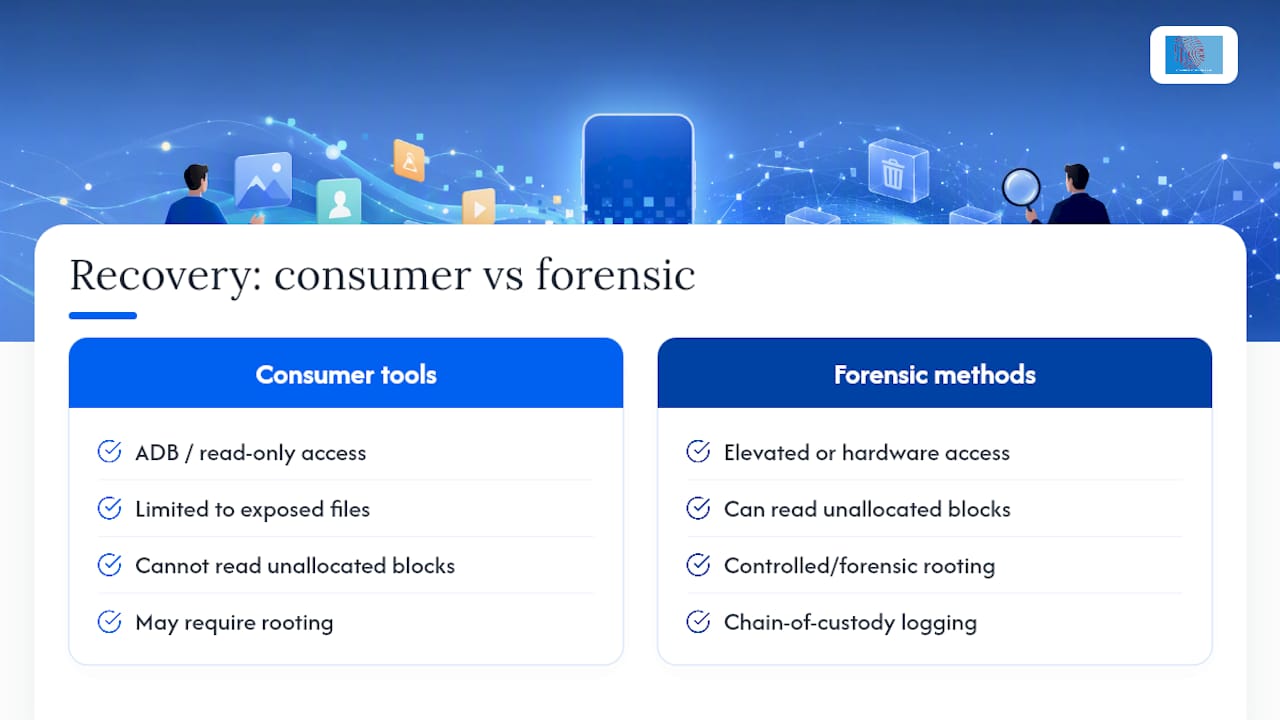
Consumer-grade Android recovery software generally works by scanning accessible storage through the Android Debug Bridge (ADB) interface, which limits it to what the operating system is willing to expose.
Read-only ADB-based tools can pull content from the MediaStore trash and app preview caches, but documentation for these tools confirms they cannot read unallocated blocks or perform genuine bit-level undelete on modern devices without elevated, often destructive, access. Some software vendors market “deep scan” features that claim to recover permanently deleted photos or messages, but these typically require rooting the device, which itself alters system partitions and can overwrite the very data being sought.
For a private user who has simply misplaced a file, this class of software may occasionally help. For anyone who needs a result that will withstand scrutiny in litigation, criminal proceedings or a corporate disciplinary hearing, consumer software is the wrong tool: it lacks chain-of-custody logging, hash verification and the documented methodology a court expects to see. There is no universal recovery tool for Android precisely because hardware architectures, OS versions and encryption protocols vary so widely between devices, which is why case-by-case forensic methodology consistently outperforms generic software.
How do you avoid overwriting data before recovery is attempted?
Every action taken on a device before recovery begins either preserves or destroys the evidence you are trying to save, with no middle ground.
Stop using the device the moment deletion is discovered. Continued app use, photo taking, or web browsing all write new data, and Android’s storage management will happily reuse space it considers free. Do not install a recovery app, since installation itself writes data to storage and may trigger the very garbage collection process that erases recoverable blocks. Avoid connecting the device to Wi-Fi or mobile data, because background sync, automatic updates and cloud backup processes can silently modify or overwrite content. If the device supports it, enable airplane mode rather than powering it off entirely, since a hard shutdown on some devices can trigger cache-clearing routines on the next boot. Never perform a factory reset under any circumstances, and resist the temptation to “just check” whether a file is still there by browsing folders, since even read access to some file systems can update metadata that examiners rely on.
What are the risks of attempting DIY recovery yourself?
DIY recovery attempts fail in two distinct ways: they either produce nothing, or they produce something and destroy the case in the process.
The technical risk is straightforward. Consumer tools cannot access unallocated space or bypass modern encryption, so most DIY attempts on a reasonably current Android device simply return no results. The more serious risk is evidential. Installing software, granting root access, or connecting to Wi-Fi to download a recovery app all alter the device’s state, and that alteration can be enough for opposing counsel to challenge the integrity of anything subsequently recovered, regardless of whether the DIY attempt itself succeeded. There is also a legal exposure risk: accessing a device without proper authorisation, even your own if it is subject to a preservation order or dispute, can create separate liability. Rooting a device to enable deeper scanning voids manufacturer protections and can trigger factory-reset-like behaviour on some models, destroying the target data outright.
How can you back up Android data to prevent this happening again?
The cheapest recovery strategy is never needing one. A consistent backup routine turns most deletion incidents into a five-minute restore rather than a forensic engagement.
Enable Google’s built-in backup service through device settings, which covers contacts, calendar entries, app data, call history and device settings automatically when connected to Wi-Fi and charging. Set Google Photos to back up images and video continuously rather than relying on manual transfers, since this is the most common category of data people regret losing. For business devices, enrol handsets in a mobile device management platform that enforces scheduled backups and can remotely preserve data if a device is lost or an employee departs under suspicious circumstances. Periodically export critical data, such as WhatsApp chat histories or specific app databases, using each app’s own export feature rather than assuming cloud sync covers everything. For anyone handling sensitive or case-relevant material, treating photo backup as evidence hygiene rather than convenience is worth building into standard practice, and it is exactly the kind of habit worth checking against related guidance on detecting deleted messages in dating apps when device-based evidence disputes arise in personal matters.
What do practitioners get wrong most often about Android recovery?
The single biggest cause of failed recovery is delay, followed closely by well-meaning attempts to check the device before instructing a lab. Powering a handset on and off, or running a recovery app “just to see,” destroys exactly the data a court would need. A properly conducted forensic examination also documents what could not be recovered and why, rather than overstating success. When recovery is unlikely, given the device state and elapsed time, that limitation belongs in the report, not left unsaid.
— Computer
How Computerforensicslab supports legally admissible Android recovery
Computerforensicslab handles forensic mobile acquisition, hardware-level extraction, chain-of-custody management and signed expert witness reporting for legal, law enforcement, corporate and private clients across exactly the scenarios covered in this guide. Its casework experience and published guides on acquisition methodology, alongside involvement in documentary projects such as Discovery+’s “999 Murder Calling”, reflect a practice built specifically around evidential standards rather than general IT repair. If a device is currently in your possession and you suspect deleted data is relevant to a case, the priority is speed: preserve the device exactly as described above, then get in touch with your case reference, device details and legal authorisation ready. Start with Computerforensicslab’s data recovery service for evidence that needs to stand up in court to see what to include in your first instruction and how quickly the lab can respond.
Sources
For independent verification, consult SWGDE’s mobile device forensic analysis best practices, NIST’s SP 800-101 guidance, and INTERPOL’s first-responder digital evidence guidelines.
- Sensors article on deleted-data persistence and recovery
- Study on deleted-data recovery for Android platforms
- NIST SP 800-101 revision: mobile device forensics guidance